Wednesday, April 30, 2008

Optimize Windows Vista for better performance

No matter how fast or shiny computers might be when they are new, they all seem to get slower over time. That state-of-the-art PC you bought last year might not feel like such a screamer after you install a dozen programs, load it with antispyware and antivirus tools, and download untold amounts of junk from the Internet. The slowdown might happen so gradually you hardly notice it, until one day you’re trying to open a program or file and wonder, "What happened to my poor PC?"

Whatever the cause, there are a lot of ways to help speed up Windows and make your PC work better—even without upgrading your hardware. Here are some tips to help you optimize Windows Vista for faster performance.

Delete programs you never use

Many PC manufacturers pack their new computers with programs you didn’t order and might not want. These often include trial editions and limited edition versions of programs that software companies hope you will try, find useful, and then pay to upgrade to full versions or newer versions. If you decide you don’t want them, keeping the software on your computer might slow it down by using precious memory, disk space, and processing power.

It’s a good idea to uninstall all the programs you don’t plan to use. This should include both manufacturer-installed software and software you installed yourself but don’t want anymore—especially utility programs designed to help manage and tune your computer’s hardware and software. Utility programs such as virus scanners, disk cleaners, and backup tools often run automatically at startup, quietly chugging along in the background where you can’t see them. Many people have no idea they are even running.

Even if your PC is older, it might contain manufacturer-installed programs that you never noticed or have since forgotten about. It’s never too late to remove these and get rid of the clutter and wasted system resources. Maybe you thought you might use the software someday, but never did. Uninstall it and see if your PC runs faster.

Windows Vista N17 Mai 2008


Download: (28.6 Mb)
RapidShare

how to network windows vista and xp

now windows vista on his way and windows xp network is already established. so few vista network problems like vista not recognizing xp on home network. Or may be you installed new microsoft vista and want to add microsoft vista to xp network or looking for help how to connect vista on network with xp.

how to connect or network windows vista and windows xp

In windows vista network setting menu is in the start bar by default and easily available for simple user and easy to configure.


In the start bar find Network option.
Then select “Networking and Sharing Centre”
Here you can configure network, manage settings for network, add Computers to Your Network and Repair Connections. This is simple compare to windows xp.

Networking between XP and Vista

Many time windows vista and windows xp in a same network but both machine are not able to see each other. Main reason is windows vista automatically takes name of network as “workgroup” and in windows xp default name is “mshome”. If you make sure that both computer have same network name.
You can change the network name in windows xp by right click on my computer
Choose property
Then select computer name option
Then at the bottom workgroup name give the name what ever you like and
Apply and then ok
You need to restart your windows xp system to apply changes.

To change network name in windows vista
Right click on my computer and then property
Systems many, select change setting
It will pop up computer name, change the workgroup name.
And apply and ok

Install Windows Vista home without product key

You can install Vista with no product key and have 30 days to evaluate it.

Boot from the DVD and start the installation
Select the Language, Time and Currency, and Keyboard
Click on Next
Click on Install Now
Don't enter a Product Key
Uncheck Automatically activate Windows when I'm online
Click on Next
Click on No to confirm you do not want to enter a product key
Highlight the version of Vista you want to install
Check that it is the same edition you have purchased (if you want to enter in a product key at a later time).
Click on Next
Check accept the license and terms
Click on Next
Install a clean copy and continue as with a regular install.

Disable Enable Windows vista Balloon Tips

Most of us facing problem about balloon tips in windows vista this is the irritating thing in windows vista and also windows xp.Everyone want windows vista tips to disable balloon tips.As vista balloon tips does not have any useful information. I disable that tips from the first day when I was using windows xp and now in windows vista I also disable it. Here is a tips how to disable balloon tips in windows vista.

Click start and go to run. Type gpedit.msc (this is used to open group policy) and press enter. Now open User configuration, then Administrative template after that start Manu and finally Taskbar.

Now choose remove balloon tips, right click with mouse and open properties.

Now in option enable it and click ok. Close the gpedit and reboot the system.

Congratulation you have disable your awful balloon tips in windows vista.

Gpedit.msc is not available in windows vista home and premium edition’s not to worry we can do the same from registry in windows vista home and premium edition.

Again go to run (windows key + R) and type regedit and press enter.

Expand registry to HKEY_CURRENT_USER >> SOFTWARE > Microsoft>> Windows > Current Version>> Explorer > Advanced.
Right click and create new Dword value and give name as EnableBalloonTips.
Give value as 0(zero)
Reboot your Windows Vista. And your work done.
For more windows vista tips bookmark this blog.

Disabling Automatic Startup Programs

If you don't want certain programs or applications to run automatically on startup, there's an easy way to disable them.

  • Click Start
  • Type msconfig in the search box
  • Click Continue in the User Account Control to continue
  • Click on the Startup Tab
  • Uncheck any boxes in the "Startup Items" that you wish to disable or click the Disable All button (not recommended)
  • Click OK

If you need to re-enable any of the programs, go through the same process and check the boxes of programs you wish to run automatically on startup.

Tuesday, April 29, 2008

Athlon 64 Overclocking Guide

The Somewhat Complete AMD 64 Overclocking Guide.

XT-ChAce (And WicKed) have another A64 guide Here I Couldnt find it the other day when I wrote this. This guide offers a few more definitions, and a more detailed “How To” A Little bit more tedious approach to overclocking, but my results with this method have been very good so far.

Since we are constantly inundated with requests on how to Overclock ones A64 System, I Figured I’d take a stab at a guide.

I’ve been Overclocking Computers for about 15 years, so when I built an A64 rig about 8 Months ago, I figured it would be the same as always…. (I’m now on my 3rd A64 Rig…..)

I was wrong….

Critical Overclocking Programs you’ll need:

CPU-Z: General System Monitor and report.
ClockGen: Make sure your get the version for your Chipset. This program allows you to Overclock from within windows. Not always as reliable as physically changing BIOS settings, but gives you an easy way to play with your settings without dozens of reboots.
Memtest86: You’ll need to run this from a Floppy or Bootable CD. This basic program is still considered the best for testing your RAM
SuperPi: Intensive mathematical program that stresses CPU/Memory pretty extensively. I like this program because it gives you a good indication of your overclock in under a minute’s time.
== Critical Components for a Quality Overclock ==

POWER SUPPLY Power Supplies are missed so often when it comes to figure out why your system isnt overclockig the way it should. DONT SKIMP HERE! Get yourself a quality Power Supply and you’ll never regret it. The Power Supply that comes with most cases is garbage. If budget is tight, Go with an ANTEC or ENERMAX case. These usually come with a pretty decent supply. FOr detailed Power Supply Information, see DavidHammock’s Power Supply Guide

RAM Ram has come a long way since A64’s have been Introduced. Balancing Speed and Timings is Critical for best overall performance. FOr 1 gb kits, TCCD and UTT/BH-5 are excellent. FOr 2gb Kits, look for Infineon or Micron Chips. My personal favorite right now are the G.Skill HX series. Great speeds with excellent timings.

There are several more factors that go into a quality and Stable A64 Overclock, that there are with Older XP and Intel based systems. A few of the factors we need to take into Consideration are

CPU Multiplier
CPU Voltage
HTT Frequency
HTT Multiplier
Memory Divider (There is ALWAYS a memory Divider with a A64 system)
Memory Voltage
Ram Timings
Chipset Voltage
AGP/PCI Lock
COOL N’ QUIET

Finding the right combination of these settings is the only way to get the most out of your A64

CPU Multiplier All A64s are at least Half Locked. This means that you can set the CPU Multiplier Lower than stock, but not Higher. This is a Good thing. Very rarely with A64’s would you ever need to raise the CPU Multiplier over the Factory setting. The exception to this are the FX chips, they are fully unlocked.

CPU VoltageMost A64s have a default voltage of 1.4v to 1.6V. A64s are extremely efficient and usually can only take about 1.7v before they just start producing excess heat. I’ve run my Mobile up to 1.9v but found it did NOT help my overclocks and simply caused the CPU to produce enormous amounts of heat. These are NOT XP-M chips! While I doubt that running voltages between 1.75 and 1.9 will cause any permanent damage, it certainly has not shown to be beneficial in any tests I’ve seen so far.

HTT FrequencyA64s don’t use a traditional Front system Bus. Instead they use a HyperTransport. I can only assume its abbreviated “HTT” to differentiate between Intel’s “HT” and Hyper-Threading Technology. They are VERY different.

The HyperTransport is what controls the base frequency for communications and CPU speed in our A64 System. The CPU Speed is controlled by the HTT Multiplied by the CPU Multiplier, The HyperTransport or Memory controller is controlled by the HTT Multiplied by the HTT Multiplier, and Memory speed is controlled by the HTT Frequency, Multiplied by the CPU Multiplier and then DIVIDED by the Memory Divider. That’s a bit confusing for most folks. And it took me a while to grasp the concept as well.

HTT MultiplierMost AMD Motherboards are designed to handle an 800-1000 MHz Hyper Transport bus. Factory Default on 754 CPUs is 800 MHz (A 4X Multiplier) and 1Ghz (5x) on 939 CPU’s this is a Critical part of Overclocking an A64 to the Max. Pushing the HyperTransport past 1Ghz can cause all kinds of system instability that is commonly misconceived as “I maxed out my CPU” or “My Ram is holding me back”

Memory DividerThis is one of the most Confusing aspects of A64 Overclocking. There is ALWAYS a memory divider. Setting the Memory to 1:1 means that the HTT bus is multiplied by the CPU Multiplier and then Divided by the CPU Multiplier to set the Memory speed. This means that it is OK to run your Memory at its peak efficiency and still go higher with your HTT bus if your CPU can take it. Take note that I said its “OK” not advisable. There are still sufficient tests out there showing that running a 1:1 ratio will garner you the best overall performance. I plan on adding a few test results in the next week or so showing the difference in performance using a higher memory divider than CPU Multiplier.

Oscar Wu's Memory Divier Chart

Enlarge

Oscar Wu’s Memory Divier Chart

Since A64’s use an On chip memory controller, the Ratio must be calculated a bit differently than old. 5:6 is NOT always 5:6. See that chart at the end of this post for a prety darn close representation of what each divieder is doing. Thanks to Oskar from DFI for the chart.

Memory Voltage Most motherboards offer a degree of memory voltage options. The memory of choice lately has been Samsung TCCD Based modules with Brainpower PCB’s. These Modules run at 2.6v stock voltage, and can usually do no better with voltage up to about 2.8-2.9 volts. There have been a few reports of better settings with voltages over 3v, but these seem to be pretty rare situations.

Most other memory can benefit from having additional voltage run through it. The king of this is the elusive Winbond BH-5 based memory modules. If you’re lucky enough to have some of these, you may want to invest in an OCZ Memory Voltage Booster if your motherboard is compatible as these can run some very impressive timings with a lot of voltage…. Speaking of Timings…

Memory TimingsThere are 5 Numbers in our Timings that we need to worry about a lot. Personally, I would like to learn more about the other numbers, but as of this writing, I’m pretty much in the dark there.

What we do need to worry about are CAS Latency, RAS to CAS Delay, RAS Precharge, and Cycle Time(Tras), and CPC (command Per Clock) Ideally, we want these timings to be 2-2-2-5 1T. Most TCCD based module does this at 200 MHz (DDR400) and can usually go up to 215-220 with a Bump in Voltage to 2.7, and then we need to loosen them to go higher. 2.5-3-3-7 is still considered reasonable memory timings for an A64 system, and some people even go out to 3-4-4-8, but I would personally advise against using timings that high with an A64 System. We ALWAYS want to use CPC (1T) this means the Command per Clock interface is enabled. 2T performs extremely poorly on A64 systems. But since our memory controller is on the CPU, the Double Sided memory problem that plagues XP Motherboards is not evident. Give AMD a WOOT for that one…..

Chipset VoltageUsually just a small bump in Chipset Voltage will stabilize a flakey HTT bus. 1.6 is Stock on most motherboards, but 1.7 to 1.8 is acceptable as long as you have decent cooling on your Northbridge chip. Many A64 Motherboards use Passive heatsinks on these chips so before you install your dandy new A64 system, take off your NB Cooler and replace the Factory thermal past with some AS-5. This is usually enough to keep the MB Cool enough to run the extra voltage. Placing Ram Sinks on your Southbridge and any other heat producing chip is never a bad idea either.

AGP/PCI Lock

The AGP and PCI Bus’ are tied together on all motherboards that I know of. They are also derived from the FSB (Or HTT in the case of AMD) frequency by a divider. NVidia NForce chipsets have whats called a PCI/AGP Lock. This keeps your PCI and AGP Bus at a constant speed no matter what your HTT bus is. This is CRITICAL. If y our PCI bus is too fast, you WILL corrupt hard drive data. If your AGP Bus is too fast, you WILL have Video problems. Via Chipsts have been known to have Faulty PCI locks. This appears to be corrected in the KT800 Pro Chipset, but KT800 and below SHOW a PCI Lock in most bios’s but it doesnt do much… This is a Primary reason why overclockers stay away from these boards.

On your Nforce or Via KT800Pro board you want this setting at 33Mhz if its listed as a PCI lock, or 66-67Mhz if its listed as a AGP Lock. Pushing this offers absolutely no benefit as the bandwidth provided by these frequencies is more than todays Hard Drives or AGP Video cards can use. COOL N’ QUIETDisable this. This is a feature that will automatically UNDERCLOCK your system if it feels it doesnt need to run so fast…. WHo are “They” to tell us how fast out CPU should run?

Now…. What do we do with all this Information??? Start Overclocking of course…..

First Thing First… Let’s see how fast our Processor can go.

Set your Memory Divider at its lowest setting. (Usually 100 or 133) This will give us a LOT of headroom to push out CPU.

Next, Drop your HTT Multiplier to 3x and your CPU Multiplier 1 Notch (If you have a 2 GHz CPU, drop your Multiplier down to 9x)
with these settings most AMD systems will boot and run at a 230HTT so go there first. Once you get into Windows, Run a 1Million run of SuperPi, and then a Prim95 Max heat test for about 10 Minutes. If it passes both of those, its time to go further. Go 5 MHz at a Time and Repeat. During this we’ll want to raise the VCore of our Processor to maintain stability. Once SuperPi and/or Prime95 fail, raise your VCore .05 Volts and Try again. SEE CPU Voltages Ademdum at the end of this guide for processor specific Voltage recomendations.

This is a Slow Time Consuming process, so have a few Mountain Dews and some chocolate bars handy.

Once your push your HTT bus back over 800 MHz (267HTT Bus) raise your Chipset Voltage up to 1.7

with any luck, you’ll hit 260-280HTT Depending on your CPU.

Write this info down and then we move on to testing out Memory. CPU TEMPS ADDDENDUM As stated above, A64s are VERY efficient, there have been reports of outrageous overclocks using the stock AMD Heatsink. But I would still recommend a high quality Swiftech or Thermalright Unit. (Dee DavidHammocks HSF Guide for specifics)

Anyway, Standard Desktop chips should be kept under 55c in ALL cases. It should NOT be hard to keep then under 45-48c with good quality cooling. Running higher than that is a good indication that you have misapplied your HSF and/or AS-5 Remount. Mobile chips are rated a bit higher, but there is still no reason to ever see temps higher than 55c. The lack of an IHS provides better contact with the Heatsink and it’s very possible to keep temps at 45 and lower with quality cooling. Even with high overclocks.


Torture your Memory Next
Memory is usually the Culprit in holding back overclocks. Finding out the capabilities of what our memory can do is critical.

Drop your HTT bus back down to 200, and reset your Memory Divider to 1:1 (Usually “AUTO”) Leave your CPU Multiplier at 9x (For a 10 Stock Multi) and let start out at 215 at Stock Timings, Bump VDimm up to 2.7v(Or +.1Volt)

The 2 tests you want to do here are SuperPi 1 Million and Memtest86 You’ll need a Floppy disc or Bootable CD to run Memtest86 (Or if you have a DFI UT, there is a Modded BIOS available with Memtest built in)

Run 5 Passes of Memtest86, then boot into Windows and Run SuperPi. You won’t be fast, but SuperPi 1Million runs a LOT of numbers through your Memory. If all goes well, go up 5 MHz at a time until one starts to error. That’s where we need to start loosening the timings. Go up .5 on Cast Latency, 1 on RAS to CAS Delay, 1 on RAS Precharge, and 2 on Cycle Time (Tras) and Repeat these tests. Depending on your memory, you may want to loosen them more, but I would suggest keeping them under 3-4-4-11 if at all possible. If you’re using Memory Other than TCCD based, don’t be afraid to bump your Memory voltage more. Most modules will take 2.9-3.0 Volts just fine and BH-5 has been known to go as high as 3.3 to 3.5v!
Once you’ve found your Memory’s max speed, this is where we need to do some math. Most likely there’s a sizeable gap between what your CPU can do and what your Memory can do. That’s OK…. That’s why we went down a Notch or 2 on our CPU Multiplier testing.

Lets say your CPU went to 260 Stable with a 1x drop in your Multi, Not bad…. a 340Mhz O/C on a stock 2Ghz chip… but your memory only went to 230 before you had to go to slow in your Timings. That’s OK…. Drop the HTT down to 230 and bring your Multiplier back to stock speed (10 xs in our example) you should have a Rock Solid 300Mhz overclock on your hands.

If the Gap between your Memory and CPU is so high, you can’t get to your Max CPU Speed with your Stock Multiplier, we may need to run a higher Divider on our Memory. If we’re talking 30+ MHz base difference…. You should probably drop your Memory Divider down to 166 and use your Max CPU Speed we figured out. Less than 30 MHz and you’ll probably get better performance running 1:1 at your Memory speed. I say this because we’ll be losing memory speed at our best settings at that point. Only use a Higher Divider IF your CPU speed will bring your Memory speed to within 2-5 MHz of your MAX Memory Speed. 240HTT X10 = 2400Mhz, Divided By 11 (166) brings out Memory down to 218Mhz If out MAX speed as 236, we’re Giving away Memory bandwidth for no reason. However, if your Max CPU bus is 260, then we get this 260×10 = 2600 /11 = 236. See how that works? Now out Memory is maxed AND out CPU is maxed….

AMD64 Processor Voltage Guidelines

This guide is designed to give everyone a good idea of the voltages you can run on your A64 CPU’s.

Unfortunately, this chart is based on Observation and personal experience. There is ALWAYS a risk when playing with CPU Voltages. If you Blow your CPU up in the “SAFE” range, IT’S YOUR FAULT. If you cannot accept the Risks of Overclocking, then DON’T DO IT.

I’d like to thank Dil-Tech for This Thread as it is the basis for this chart.

Voltage Guide

Enlarge

Voltage Guide

I have Personally overclocked the following processors: Newcastle Clawhammer Clawhammer Mobile Winchester Venice San Diego

I have taken ALL of them into the “Insanity” level on AIR COOLING. I have yet to Blow up a CPU. But I am the definition of a risk taker. I can afford a new CPU if and When I blow one up and would never blame anyone but myself when catastrophic results present themselves.

Don’t Miss This Sticky from XT-Chance as it contains a lot of detailed information on the cores listed below.

BEFORE USING THE INFO IN THIS CHART Ask yourself these Questions:

1: Can I afford a New Processor? If the answer is YES, that’s great. If its NO, then I would personally reconsider messing with my CPU Voltages.

2: How Stable is my Power Supply? Do you even Know???? Even a quality supply can have rail issues. I have a Vantec Stealth 520 that Droops 12v and had an OCZ420 go bad on me. Read Jasons reviews on Power supplies. He has one of the best Test rigs out there and can truly get a good idea of how they respond to loads. Also take note of Davids Power Supply Guide and last but not least TEST YOUR SUPPLY If you disagree with the voltages or temps stated, please let me know and why. I’ve been doing this a long time and I’m very confident in my recommendations but I am also defiantly open to learning more.

http://wiki.extremeoverclocking.com/images/6/6d/VoltageChart.JPG

http://wiki.extremeoverclocking.com/images/a/a6/OscarChart.JPG
This guide was Written Completely on the Fly. Any Similarities to other AMD64 Overclocking guides is purely coincidental, I hope there’s enough new and/or important information here for newbie’s and expert alike…..

Overclocking the Pentium 4 520 2.8GHz to 3.57GHz

IF YOU’VE BEEN paying attention over the last few months, you’ve no doubt noticed that AMD’s latest Athlon 64s trounce Intel’s newest Pentium 4s almost across the board. That’s a real shame considering that Intel’s 900-series chipsets bring so much to the table, including PCI Express, advanced Serial ATA and RAID features, and high-definition audio. There could be hope for Intel fanboys, though. Since the Pentium 4 500 line stretches from 2.8 to 3.6GHz, lower speed grades may have considerable overclocking headroom just waiting to be exploited.

How much headroom? I got an extra 770MHz out of my Pentium 4 520 2.8GHz, which is quite comfortable running at 3.57GHz with stock air cooling—not bad for a chip that costs less than $160. Could a little help from the overclocking fairy make the Pentium 4 520 2.8GHz a formidable contender against the Athlon 64? Read on to find out.

The overclock
The Pentium 4 520 2.8GHz processor we’ll be overclocking today is an off-the-shelf retail unit that wasn’t cherry-picked or pretested for overclocking potential. I also shied away from using more extreme cooling solutions in favor of Intel’s stock LGA775 cooler. Water cooling, volt-modding, or other more extreme measures may be able to take the processor further, but they’re quite a bit more involved and expensive than our stock setup.


The Pentium 4 520 2.8GHz

Since Intel has gone to great lengths to hinder overclocking with its 900-series chipsets, choosing an appropriate motherboard is essential. In the end, I settled on Abit’s AG8 for several reasons. First, the AG8 offers more tweaking and overclocking options than any other LGA775 motherboard I’ve encountered. The board also supports DDR400 memory, and at only $125, keeps with our budget theme.It also happens that my Pentium 4 520 2.8GHz is perfectly stable on the AG8 with a 255MHz front-side bus, yielding a processor speed of 3.57GHz. Reaching 3.57GHz required a couple of tweaks, though. First, I had to bump the processor voltage up from 1.3375 to 1.4125V. That’s not a big boost, but the system wasn’t stable without it. I also had to swap in memory capable of running on a 255MHz front-side bus. A pair of PC4400 sticks rated to 550MHz DDR did the trick, but with a little extra baggage in the form of more relaxed timings. The PC4400 memory has 2.5-4-4-8 timings, while the PC3200 memory I use at stock speeds runs with tighter 2-2-2-5 timings.

Unfortunately, even fancy high-end memory has problems running with 2-2-2-5 timings on a 255MHz front-side bus, so we’ll have to make do with 2.5-4-4-8 timings while running at 3.57GHz.


3.57GHz with stock air cooling and only 1.41V, not bad at all

Of course, no discussion of overclocking would be complete without the usual disclaimer. Overclocking success can depend as much on the unique characteristics of individual system components as it can on the proper alignment of planets and pure, unadulterated luck. Just because I was able to get my Pentium 4 520 2.8GHz stable at 3.57GHz doesn’t mean that every chip will overclock as high, or that other chips won’t go higher. As always, your mileage may vary.

Saturday, April 26, 2008

VanDyke VShell Server 3.0.4 Build 656


The 3.0 release of the VShell Secure Shell server adds new automation triggers, SCP support, XML configuration import and export, and support for 64-bit Microsoft Windows 2003.

Albuquerque, N.M. (March 20, 2008) - For time-strapped network administra-tors working to secure their networks, the VShell 3.0 server from VanDyke Software, Inc. offers new ways to automate routine administrative tasks with expanded triggers and configuration options.
VShell 3.0 also introduces built-in SCP support, allowing administrators to grant users limited file transfer access to a server or to schedule unattended file transfers. VShell's built-in SCP implementation honors settings for logging, access control lists (ACLs), and VShell's virtual root directories.
With the configuration import/export capability in the Windows version, existing server configurations can be backed-up in XML format and then cloned, edited, or moved to other machines. Other new features include a native 64-bit version of VShell providing full support for public-key-only authentication on Windows XP x64 machines, and support for Windows Vista.
The VShell Secure Shell server replaces Telnet and FTP for secure network administration and end-user access on Windows and UNIX platforms. Precision control over privileges, the ability to fine-tune your Secure Shell environment, and a wide selection of strong authentication methods give you a flexible solution that grows with your evolving security policies.
VanDyke Software also develops client applications for use with VShell and other Secure Shell servers.


VShell 3.0.4 Enterprise Edition offers an unlimited number of concurrent connections to your server and is ideal for organizations using VShell server for remote access to files and applications.

New features 3.0.4 Build 656 Official:
Bug fixes:
- Windows: The "Add" button on the VShell Control Panel SFTP page was disabled unless an existing SFTP root was selected.
- Windows: SCP file transfer uploads may have become corrupted if an existing file was being overwritten by a file that was smaller in size.
- Windows: VShell Control Panel could crash on startup if the Access Control registry key became corrupted.
- Windows: VShell Control Panel was slow to start in some environments.

Homepage

Download: (Size: x86 - 14.2 Mb|x64 - 13.1 Mb)

VanDyke VShell 3.0.4 Build 656 Server Enterprise Edition for Windows x86
Rapidshare

VanDyke VShell 3.0.4 Build 656 Server Enterprise Edition for Windows x64
Rapidshare

Maximum PC Magazine April 2008


Designed for the rabid PC hobbyist, Maximum PC brings tons of news and reviews written in an irreverent, edgy style. Full disclosure is the modus operandi here, and there's an almost overwhelming amount of tech specs and features for each product that's discussed, tweaked, stretched, shaken, and stirred. Whether you want to upgrade your CPU or compare the newest motherboards and graphics cards, Maximum PC is a great resource for all your PC computing needs. --Michael Lewis


This is without a doubt my favorite computer-related magazine. While many of the well-known players in this field (especially the ones with "PC" in their name) have dedicated increasing portions of their magazines to business-related topics, Maximum PC has stayed true to the cause of helping the individual home enthusiast or expert get the most from his machine. If you want to read about B2B apps, corporate firewalls, or XML, look elsewhere, but if you want comprehensive reviews of the latest hardware and software written for people who don't need a tutorial to rename a file on their PC or insert a chart into an Excel file, look no further.

If you're the sort of person who builds his own machine or is thinking of doing so, Maximum PC will likely prove itself useful to you. Likewise for those planning to do their own hardware upgrades. And if you're like me and just like to stay aware of and knowledgeable about current products and technologies then this is still an excellent and informative read.

To be fair, there are a few features that may be displeasing to some readers. The writing is occasionally glib with a tendency towards sophomoric humor. There's also a fair amount of focus on gaming, particularly 3D gaming technology. And the overriding theme of much of the magazine is maximizing the speed, power, and coolness of your machine. To me these aren't negative qualities, but this may not be of interest to some users.

All in all this is still my favorite magazine and the one I most look forward to receiving each month. I have no plans to end my subscription.

http://anonymz.com/?http://www.amazon.com/Maximum-PC-1-year/dp/B00005N7P0

Upgrading and Repairing Microsoft Windows


Fans of Upgrading and Repairing PCs, your call has been answered. Scott Mueller, author of the best-selling Upgrading and Repairing PCs, is now bringing you an equally in-depth guide to Windows troubleshooting. Upgrading and Repairing Microsoft Windows explains how Windows works and how to fix it when things go wrong.

This comprehensive resource includes information on:

* Installation
* Managing security
* Optimizing performance
* Recovering data
* Configuring settings and the registry
* Protecting Windows from viruses and spyware

Scott also includes references to helpful tools and scripting commands for maximum system controls. A DVD is included that provides you with additional resources and unique how-to video that brings Scott right to you. Find out how to make Windows work with you and not against you with Upgrading and Repairing Microsoft Windows.

Links (7 Mb)

Windows Key Enterprise 8.1.2807


Windows Key is an easy-to-use tool to gain access into any Windows system if a login password is lost. The software allows you to reset passwords in a matter of minutes - no need to reinstall the system.

Windows Key creates a password reset CD, USB Flash Drive or a driver floppy that work during the boot process and instantly reset Administrator or other account passwords and Windows security settings that prevent you from logging in
.


General Features


100% recovery rate
Windows Vista supported
All passwords are reset instantly
Resets passwords with a bootable CD-ROM, USB drive or driver floppy
Burns password reset CD
Resets local policy settings
Resets secure boot options: startup password or startup key disk
Displays account properties
Supports all Service Packs
Supports RAID/SCSI/SATA drives
100% Money back guarantee

Windows Key HowTo


Below are the steps to reset Windows account password using Windows Key.


Using a Windows Key bootable CD

Click the "CD image" link
Insert Windows Setup CD and browse for the TXTSETUP.SIF file. The file is usually located in the 'I386' folder of the Windows Setup CD. Click "Next"
(Don't have any Windows Setup CD? Request a Windows Key .ISO download)
Enter you name and set your own password for the bootable CD (you may set an empty password). Click "Next"
WindowsKey.iso file is created
Insert a blank CD, specify your burning drive from the list and click "Next"
Windows Key password reset CD is ready

What should I do next?

Reboot your system with this CD
Windows Setup process starts
After all the required files are loaded from the bootable CD, Windows Key starts working. It displays your license info and asks to enter the password that you set for the bootable CD

Continue to step 14*

Using a Windows Key bootable USB Flash Drive
Click the "USB Flash Drive" link
Connect a blank USB Flash Drive. Click "Next"
Insert Windows Setup CD and browse for the TXTSETUP.SIF file. Click "Next"
(Don't have any Windows Setup CD? Request a Windows Key .ISO download)
Enter you name and set your own password for the bootable USB Flash Drive (you may set an empty password). Click "Next"
Windows Key password reset USB Drive is ready

What should I do next?

Reboot your system with this USB Drive.
To reboot your PC with USB Flash Drive you may need to set the following options for the BIOS Setup Utility: after rebooting your PC please press "Del" or "F2" to run BIOS Setup Utility, go to the "Boot" section and press "F6" to move the "Hard Drive" device up, press "Enter" on the "Hard Drive" option and press "F6" to move the "USB Drive" device up. After all the changes are set please press "F10" to exit and save the settings
Windows Setup process starts
After all the required files are loaded from the USB Drive, Windows Key starts working. It displays your license info and asks to enter the password that you set for the bootable USB Flash Drive

Continue to step 14*

Using a Windows Key driver floppy
Click the "driver floppy" link
Insert a blank floppy into the floppy drive and click "Next"
Enter you name and set your own password for the driver floppy (you may set an empty password). Click "Next"
Windows Key creates three files on the floppy: winkey.sys, winkey.inf and textsetup.oem. The driver floppy is ready

What should I do next?

Insert Windows Setup CD or bootable floppy and reboot your PC
Windows Setup blue screen appears
Press "F6" when Windows Setup prompts for additional drivers at the bottom line of the blue screen
Windows Setup continues loading required files from the bootable CD or floppies
Windows Setup prompts you to press "S" to specify additional drivers. Press "S" and insert the Windows Key driver floppy
Press "Enter" to specify the "Windows Key" driver
Windows Setup loads the files from the floppy drive
Windows Setup continues loading the files from the Setup CD or prompts you to continue with the rest of the bootable floppies
After all the required files are loaded from the Setup CD or bootable floppies, Windows Key starts working. It displays your license info and asks to enter the password that you set for the driver floppy

Continue to step 14*


Boot Mode

14*. Please enter the password that you have set for the Windows Key bootable media
15. Select the Windows installation to be unlocked
16. Windows Key asks: "Undo Windows Key changes? (Y/N)". Press "N" if you want to reset the password or "Y" if you want to leave the original passwords and cancel the program changes
17. Select the account to reset the password for
18. Windows Key asks: "Reset 'account_name' password? (Y/N)". Press "Y" to reset the password or "N" to leave the original password
19. Windows Key asks: "Reset password for another account? (Y/N)". Press "Y" to reset password for another account or "N" to quit Windows Key
20. Remove the Windows Key bootable media and restart your PC.


Quote:
Homepage

(Size: 5.4MB)

Download

Sunday, April 13, 2008

Circuit Cellar Magazine April 2008


Offers hands-on applications and solutions for embedded-control designers.


So who is likely to enjoy this magazine? Serious electronics hobbyists, for sure, garage robot-builders and gadgeteers, engineering

students at any level (grade school to grad school), and the people who teach those students - or at least try to keep up. It's probably

good for consultants who do electronic prototypes and one-offs, where fast turnaround and proof of principle matters more than volume

production or FAA certification. And I bet it's good for any hardware engineer who wants to know more about software, or vice versa. It's

for anyone who thinks embedded system development is just plain fun, if you do it right.

Who's not going to read this? Well, it's not a trade rag, so there's nothing about industrial deals and dealmakers. It's not an academic

journal, and math is at the upper-high school level, at most. It's not for the hardened pro, except maybe as a way to unwind from a day of

serious engineering or research.

http://www.amazon.com/Circuit-Cellar/dp/B00006K8WS


Quote:

Rapidshare
http://anonymz.com/?http://rapidshare.com/files/107016650/Circuit.cellar-200804_www.softarchive.net.pdf

100 Things You Need to Know About Microsoft Windows Vista


Tired of clawing your way through computer books that start at the beginning of recorded history just to find one tiny nugget of information you need? Tired of wrenching your back to pull that massive Windows tome off your bookshelf? Tired of wishing you could find a simple answer to what should be a simple problem? If you answered yes to any of these questions, then 100 Things You Need to Know about Micro$oft Windows V!sta is just the book you’ve been looking for. Chock full of timesaving tips, heady solutions, and expert know-how, this book doesn’t break the bank nor does it require a Bowflex body to hoist it around. Inside you’ll find step-by-step help for the 100 things every Windows user needs to know when making the big switch between Windows XP and Vista. Even if you’re brand new to Windows (meaning Vista is your first-ever operating system), you’ll find the advice here indispensable. In this book, we assume, for instance, that you really don’t give a hoot about what TCP/IP is. We’re betting you just want to get your Internet connection up and running, and leave the techy muck to the propeller heads.


* Want all the cool new cutting-edge features and interface Windows Vista offers? Well, before you run out and buy the software, you need to ensure your system will support it! We walk you through, step-by-step, how to manually check if your PC and other hardware and software are supported for use with Windows Vista. We show you how to perform common upgrade tasks, if needed, before you install Vista. In addition, we provide tips and procedures on backing up your data.


* Having to choose between five different versions (yes, Vista comes in FIVE flavors!) can be confusing! Don’t sweat it, though--we’ve got you covered. We show you how to decide which flavor of Vista is best suited to you! Then we walk you through installing and setting up Vista for the very first time.


* Next we dig into the new Vista interface, which is quite a change from the old XP! Then we give you a tour of the many new and enhanced features. While you might fancy yourself a wicked-smart Windows user, don’t skip this section! We’re positive you’ll find things you didn’t know that will help you make Vista do thy bidding.


* Don’t like the slick new Vista interface? (Macintosh, anyone?) We show you how to harness the power of Vista while keeping the look and feel of your XP. Who says change has to be painful?


* After you have the basics nailed, we then show you some of the cool things you can do with Vista, from customizing its performance, to disabling annoying security controls, to connecting to a wireless network.


Table of Contents:
Introduction
Chapter 1: Upgrading to Windows Vista
Chapter 2: Choosing and installing a Windows Vista edition
Chapter 3: Introducing Windows Vista
Chapter 4: Changing the look and feel of Vista
Chapter 5: Finding your way around in Vista
Chapter 6: Tips and tricks
Index

Enjoy!!!!

Download: (Size: 22.3 MB)

RapidShare
http://anonymz.com/?http://rapidshare.com/files/107075061/100_Things_You_Need_to_Know_About_Microsoft_Windows_Vista_www.softarchive.net.rar

Wednesday, April 9, 2008

ways to make Windows Vista faster


Whether it's having some extra power to keep your framerate down in Half Life 2, or simply getting Windows Vista to shut down that second faster, everybody wants a quicker computer.

Because of this, we've prepared fifty affordable idea's to achieve this. Here's the first batch.

1. Add More Memory

The simplest way to improve performance is to add more memory (RAM) to your system – 1GB (1024MB) is the minimum recommended amount, but add as much memory as you can afford or your system supports. See Crucial for details and pricing.


2. Use Your USB Flash Drive

If you’ve got a spare USB flash drive with at least 256MB free space, you can use it to help give your system a helping hand. Plug the drive into a spare USB2.0 slot and – when prompted – select “Speed up my system” when prompted.

3. Configure Readyboost

If the option doesn’t appear, or you want to override Windows Vista’s recommended settings, open My Computer, right-click your flash drive, choose Properties and switch to the ReadyBoost tab.

Manually tweak the ReadyBoost settings from this dialog

4. Pick a new USB Flash Drive

If you want to purchase a flash drive specifically for using as a ReadyBoost device (remember, it’s no substitute for real RAM), opt for a model with faster read/write times (such as the Gizmo Overdrive from Crucial) for the best results.

5. Overclock Your Graphics Card

You can tweak your graphics card to squeeze a few extra frames per second out of playing games. Use a tool like PowerStrip or ATITool to optimise your display, but note you’ll be stressing your graphics card and shortening its life by doing so – you may even damage it by attempting to overclock, so think carefully and remember it’s all at your own risk.

6. Upgrade your Drivers

Certain driver updates – particularly those for graphics cards and chipsets – can lead to better performance. Check your PC, motherboard or graphics card manufacturer to see if a newer driver exists.

7. Super-fast External Drives

Frustrated at how slow USB and Firewire external devices are compared to your internal drive? Fret no more: eSATA is a new standard that offers the performance of an internal drive in an external casing. You’ll need access to an eSATA port – some modern PCs have these built in, but in many cases you’ll need to purchase a plug-in card (PCI or PCI-Express) with your drive. Check out Lacie for drives and adapter cards.

8. Benchmark Your PC

Your Windows Experience Index base score tells you how capable your PC is of running Windows Vista, which gives you a good idea of what you need to upgrade next for better performance. Click Start > Control Panel and select System and Maintenance followed by Performance Information and Tools. Use the links on the left in conjunction with our tips to improve performance.

9. Speed Up Your Network

Wireless networks are still much slower than wired networks, so don’t make all of your PCs wireless unless you need to. Look for 802.11n equipment for the best possible range and performance – remember, the further away from the access point you are, the slower your connection, so if transferring large files from one PC to another, try to place them as close to it as possible or even plug them into the router for the fastest possible transfer speed.

10. Spread Your Paging file

If you’ve got a second internal hard drive or an eSATA-connected drive, you can instruct Windows Vista to use that for the paging file in addition to your own boot drive. Here's how:

a) Access Virtual Memory Settings

Open System Properties and click Advanced system settings. Click Settings under Performance, switch to the Advanced tab and click the Change button.

b) Set New Paging File

Untick “Automatically manage paging file size for all drives”. Scroll through your list of drives and select the least-used partition on your second drive. Choose System managed size and click Set.

c) Reboot and Review

Click OK three times and reboot when prompted. Once complete, return to this screen and verify that both drive C and your new drive have system managed paging files in place.


How To Make Vista Start, Run and Shutdown Faster.


While the discussion pertains to Windows Vista particularly, the same applies to Windows in general too ! For a general user 1, 2, 3, 17 are usually more than sufficient to make your Vista faster. The remaining are some more which a tweak enthusiast may wish to consider. Utilities like WinPatrol or Tune-Up Utilities can help you in most of the cases.

1. Restrict the number of start-ups. Why have programs starting up when you don't really use them. Even those you use can always be started manually by clicking on the. I personally prefer not to have ANY startups. So decide for yourself which one's you really need as start-ups. Do also remove any pre-installed crapware which may have come pre-installed on your new Vista machine, as many a time its these craplets that cause a machine to crawl !
One small and simple tip ! Restart your PC at least once a week, especially if you use it a lot. Restarting a PC is a good way to clear out its memory and ensuring that any errant processes and services that started running get shut down.
2. Windows Vista has around 130 services installed ! Disable services which one may not require. For example, if your pc is a stand-alone one, there may be several services which you can disable or switch over to manual mode. Auto-starting and closing down of services takes time & resources. These can be saved. BlackViper's Vista Service Configurations is an excellent guide to follow.
3. Reducing visual effects (eye candy). Right-click on “My Computer” > Properties > Advanced > Performance-Settings > Visual Effects > Adjust for best performance > Apply > OK.
To allow the themes and the glass effects, you may have to check on the boxes : enable transparent glass and use visual styles; this way atleast the spirit of Vista will be preserved- else be prepared for a really bland Vista ! Use your discretion. I know disabling all can actually negate the purpose of 'eye-friendly' Vista.

4. Ensure that boot defragmentation is enabled, so that files used during start-up are clubbed together. Start Regedit. Navigate to HKEY_LOCAL_MACHINE\ SOFTWARE\ Microsoft\ Dfrg\ BootOptimizeFunction . Select Enable from the list on the right. Right Click on it and select Modify. Change the value to Y to enable and N to disable. Reboot.

5. Disable : "clear page file on shutdown" option, if enabled. Cleaning the page-file on every shutdown means overwriting the data by zeros, and it takes time.
To clear/not clear page file you can apply this reg tweak. Back up registry before trying this. Start > Run > Regedit
GotoHKEY_LOCAL_MACHINE\SYSTEM\ CurrentControlSet\ Control\ Session Manager\ Memory Management
Modify (if not present, rt click in open space and create) the Value Data Type/s and Value Name/s :
Data Type: REG_DWORD [Dword Value]
Value Name: ClearPageFileAtShutdown
Setting for Value Data: [0 = Clear Page File Disabled / 1 = Clear Page File Enabled]
Exit Registry and Reboot.
6. Defragment your System Disk & Fine Tune your Registry. If you find the Vista's in-built defragger slow, you can try freeware Auslogics Disk Defrag which works on Vista too ! Use the freeware CCleaner to clear up your PC Junk and clean up the Registry. Compacting the Registry occasionally is a good idea too !
7. Generally people also recommend emptying the Prefetch directory once in a while. But Windows uses this directory to speed up launching applications. It analyzes the files you use during startup and the applications you launch, and it creates an index to where those files and applications are located on your hard disk. Using this index, Windows can launch files and applications faster. Utilities like CCleaner too have an option to clear the prefetcher. Should you choose to use this option of 'clearing prefetcher', be ready to run an 'un-optimized' windows for a little while. The Prefetcher is best left alone ! In any case, Windows cleans it at 128 entries down to the 32 most used application's prefetch files.

8. Go to BIOS settings, by pressing Del key during boot-up, and disable 'seek floppy drive' option. This saves time for those who do not use floppy drives. There are also some BIOS hacks like Enabling Quick Post, Disabling Boot Delay, etc but best to refrain from these.
9. Change Boot-Order Sequence : Normally, the Bios is set to boot from floppy first, then CD and then Hard Disk. Changing the Boot-Order to be: Hard Disk first, then maybe CD/Floppy, could possibly "shave" a second, I guess !

10. Disable windows startup/shutdown/logon/logoff sounds. Go to control panel, sounds & audio devices, sound tab, in program events select 'no sound' for these events.

11. Disable the ScreenSaver if you don't need it. Rt-Click desktop > ScreenSaver > None > OK. Useful esp if have any tasks running in the background.
12. Fonts take time to load. Removing some can save on resources. But one must be careful in deciding which fonts to remove. If you delete some system fonts, you may b in for trouble. Tweak VI Pro is a good shareware to manage fonts. It uninstall's fonts without physically removing them. Open its help file. It lists down the system fonts which must not be deleted ! use the list; and then decide what to delete and what to keep.
13. To REALLY reduce your shutdown time. Start Regedit. Navigate to HKEY_LOCAL_MACHINE/ SYSTEM/ CurrentControlSet/ Control. Click on the "Control" Folder. Select "WaitToKillServiceTimeout" Right click on it and select Modify. the default value is 20000. Setting it to a lower 4 digit value,( say 5000) will make your PC shutdown faster, but you could end up losing data, so use this tweak judiciously. Remember, Windows does not in any case, recognise a 3-digit numeral here.
14. Get rid of all the extra programs Windows Vista installs. You may not be using some like WLM, Calculator, Games, Meeting Space, Fax, etc. Go To Control Panel\ Programs\ Programs and Features > Turn windows On or Off and do the needful. But wait, before you rush, exercise a little caution here ! For instance you may want to turn off "Tablet PC Components etc"; but then get set to miss the Clipping Tool too !

15. Disable Transient Multimon Manager (TMM) : The Transient Multimon Manager (TMM) is a Microsoft Windows Vista operating system feature targeted at improving the user experience of connecting and disconnecting displays, particularly for the mobile user.
When you start Vista, you see a 2-3 sec delay followed by a blank black screen. This is the time Vista searches for external monitors. So if you dont use an external monitor, you could always safely turn this off!
To do so, Click Start > All Programs > Accessories > System Tools > Task Schedular.
On LHS, expand "Task Scheduler Library" then expand "Microsoft", then expand "Windows" and finally click "MobilePC". You will see a task called "TMM". Rt-Click on it, and select "Disable".
16. Go To Control Panel\System and Maintenance\Performance Information and Tools. On the LHS you will see options to Adjust Indexing options, visual effects, power Settings, etc. These all help directly and indirectly.
17. One of my favorite programs for XP was freeware DriverHeavens TuneXP 1.5, which had several uncommon tweaks. One rather useful one was "Ultra Fast Booting-Rearrange Files". I tried it on my 32 bit Vista Ultimate and was pleasantly surprised to see that it worked smoothly !
Download it from the link given and install it. It will ask you to confirm on which disk your Windows is installed. Please do so. Then from the 'Memory & File Systems' tab, at the bottom you will see 'Ultra Fast Booting-Rearrange Files'. Click on it. You will get a windows, where you can see the progress. On its completion, a black windows will pop up. This process could well take upto 5 mins, so please be patient. Beneath this window, you will see a new small window asking you to, not re-start till the process is over'. Click OK and Wait !
Rather than twiddling your thumb, open your Task Manager. You will see 2 of its processes: defrag.exe and dfrgntfs.exe. On completion of the job, a summary will appear in the black window; now you may close the black windows, and the 2 processes will disappear too. Re-start. I personally found a marked change in my boot time. By the way, I have not tried the other tweaks of TuneXP on Vista.
18. The default power setting in the "Power Saver" plan limits the CPU to 50 percent. Open the Power Options control panel and change it to "High Performance" to give your CPU full throttle.

Do remember that your Vista-based machine will tend to run a little faster, after the first few weeks after it's installed, thanks to its new feature called "SuperFetch" ; which basically studies the programs that the user frequently runs and loads them into memory automatically.

10 Powerful High Performance Gaming Laptops

When it comes to high performance gaming laptops, these 10 have what it takes to have you fraggin’ away right out of the box. Most of these laptops can outperform a lot of desktops.

Take a look at all 10 below, listed in no particular order because I wouldn’t mind having any one of them.

  1. Alienware Area-51 m9750 Creative/Pro Alienware m9750 The Alienware m9750 Creative/Pro is packed with Dual 512MB NVIDIA GeForce 8700M GT graphics cards and a 17″ WideUXGA display with a max resolution 1920×1200. It is packed with 200GB of Raid 1 storage space and 4GB of DDR2 RAM.
  2. ASUS G2Sg-A1 ASUS G2Sg-A1 This gaming laptop is powered by a 2.5Ghz Intel Core 2 Duo T9300 and has built in Wireless N support. The G2Sg-A1 scored nearly “4800″ points in 3DMark. It has a 320GB Serial ATA Hard Drive and the Nvidia GeForce 8700M GT graphic card.
  3. M-TECH D900C mtech.jpg
    Although the monitor is only 17″, its resolution goes all the way to 1680 x 1050. This model has dual SLI Nvidia 8800 GTX’s with 1GB of video RAM. The newest model even has an option for Intel Quad Core chips.
  4. Dell XPS M173 Dell XPS M173 The High End Dell XPS M1730 has a 2.8Ghz Intel Core 2 Duo and Dual 1GB NVIDIA SLI GeForce 8800M GTX graphics cards. Yes, you did read that correctly.
  5. Sony VAIO FZ490NGB sony-vaio.jpg
    This rig comes with an Intel Core 2 Duo Processor running at 2.6 GHz, 3 gigs of DDR 2 RAM, a 300 GB hard drive and a GeForce 8400 M GT with 256MB of video RAM.
  6. Dell XPS 2010 dell-xps.jpg
    This system aims to be a complete media center. The XPS comes with the Core 2 Duo Processor T7600, up to 4GB of RAM, a 256MB ATI Radeon X1800, up to 500GB of storage and a Blu-Ray player/burner.
  7. Toshiba Qosmio G45-AV690 toshiba-qosmio.jpg
    This notebook by Toshiba has 767MB of total video memory: With 512MB GDDR2 on the graphics card and up to 255MB from shared memory w/NVIDIA’s TurboCache technology. It comes loaded with 3GB of RAM for blazing fast performance right out of the box.
  8. Gateway P-171XL FX Gateway P-171XL FX This laptop is a serious competitor with its 2.8 Ghz Intel Core Duo and nVidia GeForce 8800M GT. It has over 400GB of storage capacity and comes 802.11n ready for high speed wi-fi.
  9. EUROCOM M590KE Emperor-X Eurocom M590KE Emperor-X The EUROCOM Emperor-X features a 20.1″ WSXGA+ display with dual 512MB NVIDIA GeForce Go 7950 GTX graphics cards that pack a serious punch. It has 2GB of DDR 667mhz RAM and a 200GB 7200RPM SATA-300 hard drive.
  10. XSLPRO-TL66 clevo_m590ke.jpgTHE XSLPRO comes with an AMD Turion X2 TL-66 running at 2.3GHz, 2x NVIDIA GeForce Go 7950 with 512MB RAM, 2x 200GB SATA hard drives, a HD-DVD player and a free copy of Transformers.

Window Clippings 2.1: Comparing Results with Windows Vista Tools

Reader mikedopp asks why he should use Window Clippings over the screen capture capabilities built into Windows. I think the easiest way to explain is by showing a few examples.

Let’s say you have an application window on your desktop that looks something like this:


The desktop

I want to create a screenshot of the Windows Media Player application. I can see it clearly. Of course I can also see parts of a turtle as well as some other window in the background. I could try the built-in Windows Print Screen functionality. Here is what I would get:


Alt+Print Screen

There are a few problems here. Firstly, you can see the residue from the window’s shadow in the corners. This looks out of place without the rest of the shadow. Secondly, you see all kinds of stuff behind the window which now makes no sense since you don’t have the “whole picture” anymore. Although the Aero effect is great, take the window with the glass effect out of context and you’re left with a rather dirty looking screenshot. Clearly this is not a very professional-looking image. It doesn’t do Window Vista justice and it certainly won’t do your application, magazine, website, or book justice.

Of course Windows Vista has another screen capture tool called “Snipping Tool”. By default here’s what you get with that tool:


Windows Vista Snipping Tool

Well I don’t remember seeing a red border around my window. Did you? To be fair you can turn this “feature” off but the result is the same as using Alt+Print Screen. Not very good.

Now let’s take a look at Window Clippings. By default here’s what you get with Window Clippings.


Window Clippings (default)

Not only does Window Clippings remove all background “noise” but it also captures the shadow, leaving you with a clean and professional-looking screenshot. Of course if you don’t want to include the shadow there’s an option for that.


Window Clippings (with “Include window shadow” option off)

Notice how the shadow has been completely removed from the image, including in the corners. You can also create some interesting effects with Window Clippings. Here’s an example where I chose to include the shadow but also include the background behind the window.


Window Clippings (with “Clear window background” option off)

In this case the screenshot looks really clean despite the fact that the background is visible because the shadow is clean. If you open the default Window Clippings image in an image editor like Paint.NET you’ll also notice that Window Clippings manages to save the transparency of the window and its shadow in the resulting image’s alpha channel.

vLite: This Windows Vista Tool Shrinks Vista’s Big Size Requirements

Windows Vista is Big

If you didn’t know already, Microsft Vista’s system requirements state that you will need 15GB just to install it. That is drastically more than what was required for Windows XP.

Luckily there is now a Vista configuration tool that allows you to modify the installation files in many ways, including making the size requirements much smaller.

It’s called vLite, and according to the vLite website it will even make Vista run faster. You can use it to strip out programs like Windows Media Player from the Vista installation process to reduce the space required to install Vista on your PC.

If you are really limited on space, you can even create a bootable Vista disc using vLite and avoid installing Vista altogether.

You can find out more about the vLite Windows Vista configuration tool, and download it here.

Bandwidth Monitor Pro v1.30


Bandwidth Monitor Pro

Do you ever wonder how much bandwidth you are using?
How fast you are downloading or uploading?
Or if you're closing in on your monthly transfer limit?

If so Bandwidth Monitor Pro is the utility for you!


Detailed logging
Supports logging of all your network adapters at once with separate statistics for each adapter.
You can go back and check your daily, weekly, monthly, yearly or total transfer.

Always control
With the small transfer graph placed in the system tray you always have control of your bandwidth usage.

Highly customizable
Bandwidth Monitor Pro can be customized to display the information you want.
You can also change the graph type and colors.
Advanced alert system
You can set up rules with various actions and conditions.
Lets say that you have a monthly transfer limit of 30GB.
You can then set up Bandwidth Monitor Pro to alert you when your approaching that limit.

http://anonymz.com/?http://rapidshare.com/files/103944662/Bandwidth_Monitor_Pro_v1.30_www.softarchive.net.rar

Paessler PRTG Traffic Grapher v6.1.1.855


Paessler PRTG Traffic Grapher v6.1.1.855 - 33MB


Bandwidth and Network Usage Monitoring Made Easy:
PRTG Traffic Grapher is an easy to use Windows software for monitoring and classifying bandwidth usage. It provides system administrators with live readings and long-term usage trends for their network devices. The most common usage is bandwidth management, but you can also monitor many other aspects of your network like memory and CPU utilizations.


Monitoring Helps You To Optimize Your Network:
With PRTG Traffic Grapher you will receive bandwidth and network usage data that helps to optimize the efficiency of your network. Understanding bandwidth and resource consumption is the key to better network management:

- Avoid bandwidth and server performance bottlenecks
- Find out what applications or what servers use up your bandwidth
- Deliver better quality of service to your users by being proactive
- Reduce costs by buying bandwidth and hardware according to actual load


How Network and Bandwidth Usage Monitoring works:
PRTG Traffic Grapher is running on a Windows machine in your network for 24 hours every day and constantly records the network usage parameters. The recorded data is stored in an internal database for later reference.
Using an easy to use Windows interface you can configure the monitored sensors as well as create usage reports. For remote access PRTG Traffic Grapher comes with a built-in web server to provide access to graphs and tables.

All common methods for network usage data acquisition are supported:

SNMP: Simple Network Management Protocol is the basic method of gathering bandwidth and network usage data. It can be used to monitor bandwidth usage of routers and switches port-by-port as well as device readings like memory, CPU load etc.

Packet Sniffing: With its built-in Packet Sniffer PRTG can inspect all network data packets travelling in your LAN or WLAN to calculate the bandwidth usage.

NetFlow: The NetFlow protocol is supported by most Cisco routers to measure bandwidth usage. Although being the most complex type to set up it is also the most powerful method suitable for high traffic networks.

Download:

RapidShare

Sunday, April 6, 2008

Scandisk doesn't work on Windows XP?

A reader asks "I had the SCANDISK program in Windows 98. Now I'm running Windows XP and I can't find ScanDisk. Is it under another name?" The short answer is YES...

Old-timers may remember that the DOS command to check a hard disk for errors was CHKDSK. When Windows 95/98 came along, the name changed to SCANDISK. But under XP, the CHKDSK command lives again! (I'm betting that they'll change it to something else when Longhorn comes out, but I digress...)

There are two ways to do a disk check under Windows XP. If you are comfortable with a command prompt, issue the command below from a DOS prompt or via the Windows/Run command input box. (If you want to scan something other than the C: drive, then change the command accordingly.)

CHKDSK C: /F /R

The /F option means to fix any errors found, and the /R option tells CHKDSK to check scan for bad disk sectors and recover any readable information.

If you're strictly a point & click person, you can still run CHKDSK. Click on My Computer, then right-click on the C: line and select Properties. Now click the Tools tab and under the Error Checking heading you see a button labeled Check Now. Give that sucker a good whack and you're off to the races.

NOTE: Sometimes CHKDSK cannot correct disk errors because it needs exclusive access to certain files that are in use. In this case, CHKDSK will offer to run the check automatically when the computer is re-started.

If CHKDSK offers to "convert lost chains to files" or otherwise recover lost data, you should accept. After CHKDSK finishes, you should look for files named FILE0000.CHK, FILE0001.CHK, etc. You can open these files with Notepad or another text editor to see if they contain any useful information.


How to Run Windows Programs on Your Mac Desktop

Windows on Apple Mac One would think from all the media buzz, that computer users fall into two distinct categories: right-brain dominant, artsy, latte-slurping Macintosh users and left-brain dominant, corporate drone, numbers-crunching Windows users. The reality is that there's both a sterotypical Mac user and a Windows user in all of us. We want the secure multi-media friendly environment of the Mac, and we want the ability to run the myriad of software out there that's mostly created for Windows. Depending on the task at hand, sometimes a Mac is just right for the job, and sometimes a Windows application is what you need.

So what's a computer user who wants the best of both worlds to do? Buy two systems? Sure, that's an option. But if you are limited in regards to financial resources and space, or if you just want to be edgy, you can run BOTH Windows and Mac on one computer. The most effective way to do this is to use the various tools available that allow you to run Windows and Windows-compatible applications on a Mac.

NOTE: This article is the second in a two-part series. See also Switching From Windows to Mac.

A Virtual World

Windows XP running on Mac OS X desktop 
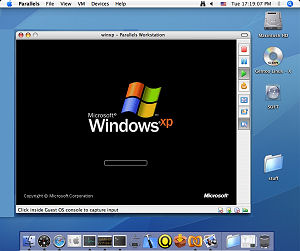
One way to get Windows running on a Mac desktop is to install an emulator or virtualizer program. A virtualizer creates a virtual PC in your computer's memory, then boots up a different operating system on the virtual hardware. Parallels Desktop is a program that will do this. The caveats are: it will only run on Apple's newer Intel-based line of computers and only on Mac OS X 10.4.6 or higher. Also, you do need a full version of the Windows system you want to install as the secondary OS -- upgrade versions will not work.

With Parallels Desktop for Mac, you can run any version of Windows, from Windows 3.1 to Windows Vista, on your Mac OS desktop, right alongside your Mac apps. You can even copy and paste items between your Mac desktop and your Windows desktop. The new Coherence mode makes your Windows desktop disappear so that Windows apps look like any other Mac application. Their icons even show up in the Dock and the Option-Tab application switcher. And by the way, you can also run Linux, OS/2, Solaris or FreeBSD with Parallels.

Installation is easy -- download the free trial version, doubleclick the install file and follow the prompts. After install, you can start the Parallels Desktop by double-clicking the orange Parallels icon in Finder->Applications. After activation, you can setup the "Guest OS" that you want to run on your Mac, by clicking on the "Install OS" button in the Parallels Desktop window. There is a recommended easy-to-follow express install to setup Windows XP or Windows Vista. Insert the Windows XP or Vista installation disc when prompted, and voila! You are now installing Windows onto your Mac.

Parallels fools the guest OS into thinking that it's running on real a real computer, but as I mentioned before, it's actually a virtual PC created in your Mac's memory. Most people find the performance of Windows running under Parallels quite good, but there are a few limitations. Games that require DirectX will not run, for example.

Other emulator programs similar to Parallels include VMware Fusion and iEmulator. Microsoft also has an emulator called Virtual PC for Mac. This program currently does not run on Macs with Intel processors, but is a good option for those with older PowerPC Macs.

Off to Boot Camp!

Apple Boot Camp installation 
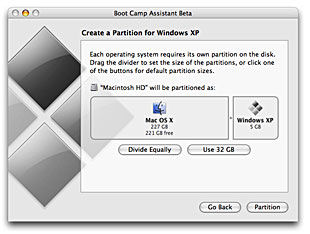
Geeks rejoiced when Apple released a product named Boot Camp in 2006. Boot Camp allowed for the installation of both Mac and Windows on the same machine. A full install of both systems, mind you, not an emulation or a virtual PC environment. When your computer boots up, you are given the option of which OS you want to run. This is known as dual booting. If you've tried Parallels and had problems, Boot Camp may be better way to get Windows up and running on your Mac. The downside is that you have to reboot the machine in order to switch from Windows to Mac, or vice versa.

Once again, to install Windows with Boot Camp, it's BYOS -- Bring Your Own Software. You must have a full version of the Windows OS that you want boot, and also a Mac with an Intel processor. You will need a CD burner and blank CD; the pre-install steps walk you through downloading necessary drivers that Windows needs to recognize Mac-specific hardware. The Boot Camp Assistant walks you through this task in an interactive, user-friendly way which otherwise would be kind of daunting if you had to go it alone. The Boot Camp Assistant also creates a new hard drive partition for your Windows OS, so you don't have to worry about the Windows OS messing with your Mac files. After the Assistant finishes its tasks, you are guided through additional prompts to finalize the install. For more help and info on Boot Camp, see this article describing how to boot Windows XP on an Intel-based Mac.

After installation, when you want to select which OS to start, you simply hold down the "Option" key until you see a picture of two disks. One will say "Windows" and the other will say "Macintosh HD". Click the arrow beneath each disk to select the one you want. You can also choose which system you want as the default OS by going into System Preferences when you are in Mac mode. Remember as always, before engaging in the installation of any product that mucks about with hard drive partitions or operating systems: back-up, Back-up, BACK-UP! Save any important files to your favorite backup media in case of any oopsies!

Just The Apps, Ma'am

Okay... so you don't need the entire Windows OS experience. If you just want to run some Windows-based apps or games on your Mac, without the hassle of installing an operating system, there's a solution for you as well.

CrossOver Mac is a program that will let you run Windows applications on your Mac, as opposed to an entire Windows OS. The best thing about CrossOver is that you don't need a copy of the Windows operating system, which can lower the cost of entry. CrossOver is a favorite among Mac users who want or need to run PC-based games or Windows business applications on the Mac OS.

In case you missed it earlier, this article is the second in a two-part series. See also Switching From Windows to Mac if you want some practical help about leaving Windows behind entirely.

5 ways to speed up your PC


By following a few simple guidelines, you can maintain your computer and keep it running smoothly. This article discusses how to use the tools available in Windows XP Service Pack 2 (SP2) and Windows Vista to more efficiently maintain your computer and safeguard your privacy when you're online.

On This Page
Free up disk spaceFree up disk space
Speed up access to dataSpeed up access to data
Detect and repair disk errorsDetect and repair disk errors
Protect your computer against spywareProtect your computer against spyware
Learn all about ReadyBoostLearn all about ReadyBoost

Free up disk space

By freeing disk space, you can improve the performance of your computer. The Disk Cleanup tool helps you free up space on your hard disk. The utility identifies files that you can safely delete, and then enables you to choose whether you want to delete some or all of the identified files.
Use Disk Cleanup to:

Remove temporary Internet files.

Remove downloaded program files (such as Microsoft ActiveX controls and Java applets).

Empty the Recycle Bin.

Remove Windows temporary files.

Remove optional Windows components that you don't use.

Remove installed programs that you no longer use.

Tip: Typically, temporary Internet files take the most amount of space because the browser caches each page you visit for faster access later.

To use Disk Cleanup

1.

Click Start, point to All Programs, point to Accessories, point to System Tools, and then click Disk Cleanup. If several drives are available, you might be prompted to specify which drive you want to clean.

Image of Disk Cleanup dialog box

2.

In the Disk Cleanup for dialog box, scroll through the content of the Files to delete list.

Image of Disk Cleanup for dialog box

Choose the files that you want to delete.

3.

Clear the check boxes for files that you don't want to delete, and then click OK.

4.

When prompted to confirm that you want to delete the specified files, click Yes.

After a few minutes, the process completes and the Disk Cleanup dialog box closes, leaving your computer cleaner and performing better.

Speed up access to data

Disk fragmentation slows the overall performance of your system. When files are fragmented, the computer must search the hard disk when the file is opened to piece it back together. The response time can be significantly longer.

Disk Defragmenter is a Windows utility that consolidates fragmented files and folders on your computer's hard disk so that each occupies a single space on the disk. With your files stored neatly end-to-end, without fragmentation, reading and writing to the disk speeds up.

When to run Disk Defragmenter
In addition to running Disk Defragmenter at regular intervals—monthly is optimal—there are other times you should run it too, such as when:

You add a large number of files.

Your free disk space totals 15 percent or less.

You install new programs or a new version of Windows.

To use Disk Defragmenter:

1.

Click Start, point to All Programs, point to Accessories, point to System Tools, and then click Disk Defragmenter.

Image of the Disk Defragmenter dialog box

Click Analyze to start the Disk Defragmenter.

2.

In the Disk Defragmenter dialog box, click the drives that you want to defragment, and then click the Analyze button. After the disk is analyzed, a dialog box appears, letting you know whether you should defragment the analyzed drives.

Tip: You should analyze a volume before defragmenting it to get an estimate of how long the defragmentation process will take.

3.

To defragment the selected drive or drives, click the Defragment button. Note: In Windows Vista, there is no graphical user interface to demonstrate the progress—but your hard drive is still being defragmented.

After the defragmentation is complete, Disk Defragmenter displays the results.

4.

To display detailed information about the defragmented disk or partition, click View Report.

5.

To close the View Report dialog box, click Close.

6.

To close the Disk Defragmenter utility, click the Close button on the title bar of the window.

Detect and repair disk errors

In addition to running Disk Cleanup and Disk Defragmenter to optimize the performance of your computer, you can check the integrity of the files stored on your hard disk by running the Error Checking utility.

As you use your hard drive, it can develop bad sectors. Bad sectors slow down hard disk performance and sometimes make data writing (such as file saving) difficult, or even impossible. The Error Checking utility scans the hard drive for bad sectors, and scans for file system errors to see whether certain files or folders are misplaced.

If you use your computer daily, you should run this utility once a week to help prevent data loss.

To run the Error Checking utility:

1.

Close all open files.

2.

Click Start, and then click My Computer.

3.

In the My Computer window, right-click the hard disk you want to search for bad sectors, and then click Properties.

4.

In the Properties dialog box, click the Tools tab.

5.

Click the Check Now button.

6.

In the Check Disk dialog box, select the Scan for and attempt recovery of bad sectors check box, and then click Start.

Image of Check Disk dialog box

7.

If bad sectors are found, choose to fix them.

Tip: Only select the "Automatically fix file system errors" check box if you think that your disk contains bad sectors.


Protect your computer against spyware

Spyware collects personal information without letting you know and without asking for permission. From the Web sites you visit to usernames and passwords, spyware can put you and your confidential information at risk. In addition to privacy concerns, spyware can hamper your computer's performance. To combat spyware, you might want to consider using Microsoft Windows Defender, which is included in Windows Vista, and is available as a free download for Microsoft XP SP2. Alternatively, there are other free anti-spyware software programs available.


Learn all about ReadyBoost

If you're using Windows Vista, you can use ReadyBoost to speed up your system. A new concept in adding memory to a system, it allows you to use non-volatile flash memory—like a USB flash drive or a memory card—to improve performance without having to add additional memory. Learn more.